
📍PrincipalDetailService
package com.example.jwt.config.Auth;

import com.example.jwt.model.User;
import com.example.jwt.repository.UserRepository;
import lombok.RequiredArgsConstructor;
import org.springframework.security.core.userdetails.UserDetails;
import org.springframework.security.core.userdetails.UserDetailsService;
import org.springframework.security.core.userdetails.UsernameNotFoundException;
import org.springframework.stereotype.Service;

//http://localhost:8080/login
@Service
@RequiredArgsConstructor
public class PrincipalDetailsService implements UserDetailsService {
    private final UserRepository userRepository;
    @Override
    public UserDetails loadUserByUsername(String username) throws UsernameNotFoundException {
        User userEntity = userRepository.findByUserName(username);
        return new PrincipalDetails(userEntity);
    }
}
login요청했을때 동작하게 하는 서비스
원래는 SecurityConfig에서
.formLogin().loginProcessingUrl("/login");
로그인폼의 주소도 설정해서 저 서비스가 돌아가게 하는게 맞는데
우리는 .formLogin(AbstractHttpConfigurer::disable)
-> 폼로그인을 안쓰기로 했으니까 돌리면 서비스에서 404에러가 뜬다
⭐
그래서 JwtAuthenticationFilter를 설정해서 /login했을때
저 서비스가 돌아가게 할 것이다
public class JwtAuthenticationFilter extends UsernamePasswordAuthenticationFilter
-> UsernamePasswordAuthenticationFilter는 스프링시큐리에서 제공해주는 필터이다.
login요청해서 username,password를 전송하면 저 필터가 동작한다.
⇒ 이걸 필터 등록해주면 됨 ! -> .addFilter(new JwtAuthenticationFilter())
📍JwtAuthenticationFilter
package com.example.jwt.config.jwt;

import jakarta.servlet.http.HttpServletRequest;
import jakarta.servlet.http.HttpServletResponse;
import lombok.RequiredArgsConstructor;
import org.springframework.security.authentication.AuthenticationManager;
import org.springframework.security.core.Authentication;
import org.springframework.security.core.AuthenticationException;
import org.springframework.security.web.authentication.UsernamePasswordAuthenticationFilter;
@RequiredArgsConstructor
public class JwtAuthenticationFilter extends UsernamePasswordAuthenticationFilter {
    private final AuthenticationManager authenticationManager;
    //login시도를 위해 실행되는 함수
    @Override
    public Authentication attemptAuthentication(HttpServletRequest request, HttpServletResponse response) throws AuthenticationException {
        System.out.println("돌아가네");
        //1. username,password받아서
        //2. 정상인지 로그인 시도 - authenticationManager로 로그인시도하면 PrincipalDetailsService가 호출됨
        //3. PrincipalDetails를 세션에 담고(권한관리를 위해- ADMIN같은거 )
        //4. JWT토큰을 만들어서 넘겨줘
        return super.attemptAuthentication(request, response);
    }
}
authenticationManager에서 로그인 해줌
UsernamePasswordAuthenticationFilter
- ID/PW 기반 Form 인증 요청 URL(디폴트 값: /login) 을 감시하여 사용자를 인증함
AuthenticationManager
- 사용자 ID/PW 인증 확인해주는 애,
- 사용자 ID/PW 를 인증하기 위해 적절한 AuthenticaitonProvider 를 찾아 처리를 위임함
providerManager
- AuthenticationManager 구현체
- AuthenticaitonProvider 를 위임 받음
provider
- 실질적으로 authentication을 돌면서 null값이 아닐때까지 확인함 → authentication을 리턴함
+) 참고자료
Spring Security 인증 처리 (2) Filter, AuthenticationManager, AuthenticationProvider, WebSecurityConfigure
Spring Security Filter Spring Security는 서블릿 필터 체인을 통한 위임 모델을 구현한다. 가 무슨 뜻인지 알아보자. 서블릿 필터 서블릿 필터는 사용자의 request 또는 서버의 response 를 중간에서 가로채서
e-una.tistory.com
📍회원가입 controller추가
@PostMapping("join")
    public String join(@RequestBody User user){
        user.setPassword(bCryptPasswordEncoder.encode(user.getPassword()));
        user.setRoles("ROLE_USER");
        userRepository.save(user);
        return "회원가입 완료";
    }

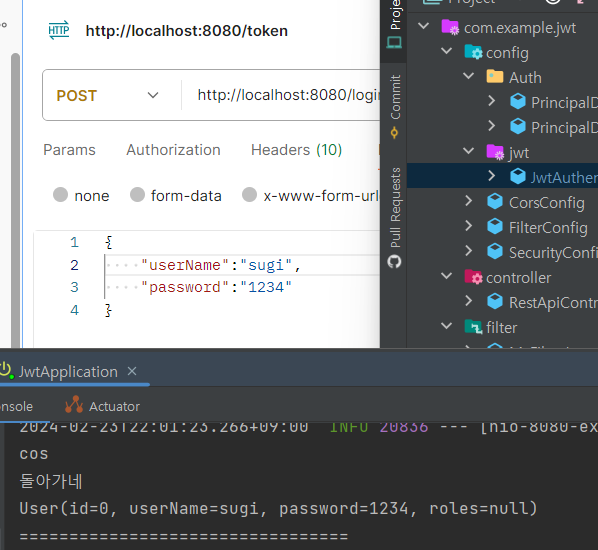
📍JwtAuthenticationFilter
1. username,password받아서
try {
      BufferedReader br= request.getReader();
      String input=null;
      while((input = br.readLine())!=null){
          System.out.println(input);
      }
  } catch (IOException e) {
      e.printStackTrace();
}BufferedReader 로 읽어와서 출력해보면 username과 password가 나옴

raw - JSON으로 보냄
보통 웹클라이언트에서 보내는거면 전자의 방법으로 보냄

⇒ 그러면 {username}&{password}이런식으로 & 로 구분된다
📍파싱하는 방법
ObjectMapper om = new ObjectMapper();
User user = om.readValue(request.getInputStream(),User.class);
만약 제이슨 형식으로 보냈다면 ObjectMapper 로 간단하게 파싱 가능하다
System.out.println(user); 해보면
잘 나온다
📍로그인 시도
attemptAuthentication
로그인을 해보기위해서는 토큰이 필요하다
생성하자
JwtAuthenticationFilter의 attemptAuthentication를 수정한다.
@Override
    public Authentication attemptAuthentication(HttpServletRequest request, HttpServletResponse response) throws AuthenticationException {
        System.out.println("돌아가네");
        //1. username,password받아서
        try {
            ObjectMapper om = new ObjectMapper();
            User user = om.readValue(request.getInputStream(),User.class);
            System.out.println(user);

            //토큰생성완료
            UsernamePasswordAuthenticationToken authenticationToken = new UsernamePasswordAuthenticationToken(user.getUserName(),user.getPassword());
            System.out.println("토큰생성완료");

            //PrincipalDetailsService에 있는 loadUserByUserName()이 실행됨
            // 여기는 로그인정보가 담김
            Authentication authentication = authenticationManager.authenticate(authenticationToken);

            //authentication객체가 session에 저장됨
            PrincipalDetails principalDetails = (PrincipalDetails) authentication;
            System.out.println(principalDetails.getUser().getUserName());
            return authentication;

        } catch (IOException e) {
            e.printStackTrace();
        }
        System.out.println("=================================");
        //2. 정상인지 로그인 시도 - authenticationManager로 로그인시도하면 PrincipalDetailsService가 호출됨
        //3. PrincipalDetails를 세션에 담고(세션에 담는 이유 권한관리를 위해- ADMIN같은거 )
        //4. JWT토큰을 만들어서 넘겨줘
        return null;
}UsernamePasswordAuthenticationToken 로 토큰을 생성한다
⇒ 근데 loadUserByName() 이 안돌아가서
authenticationManager 관련 질문입니다. - 인프런
안녕하세요 늘 좋은 강의 올려주셔서 감사합니다.authenticationManager 파라미터 전달 부분에서 문제가 있어 이렇게 게시글 남깁니다!새로 올려주신 소스코드를 보며 새로 업데이트된 시큐리티에서
www.inflearn.com
이 자료를 참고했다.
아무튼 저 함수가 끝나고 난뒤 돌아가는 함수
successfulAuthentication
    @Override
    protected void successfulAuthentication(HttpServletRequest request, HttpServletResponse response, FilterChain filterChain,Authentication authentication)
    throws IOException, ServletException
    {
        super.successfulAuthentication(request,response,filterChain,authentication);
}attemptAuthentication함수가 종료되면 이 함수가 실행된다,
→ JWT 토큰을 만들어서 request 요청한 사용자에게 JWT 토큰을 reponse해주면됨
📍토큰 만들어서 넣어보기
@Override
    protected void successfulAuthentication(HttpServletRequest request, HttpServletResponse response, FilterChain filterChain, Authentication authentication)
            throws IOException, ServletException {
        PrincipalDetails principalDetails = (PrincipalDetails) authentication.getPrincipal();

        String jwtToken = JWT.create()
                .withSubject(principalDetails.getUsername())
                .withExpiresAt(new Date(System.currentTimeMillis() + JwtProperties.EXPIRATION_TIME))
                .withClaim("id", principalDetails.getUser().getId())
                .withClaim("username", principalDetails.getUsername()) //비공개 클레임값
                .sign(Algorithm.HMAC512(JwtProperties.SECRET));

        response.addHeader("Authorization", "Bearer " + jwtToken);
}authentication을 받아와서 토큰을 생성한다.
→ withClaim으로 아이디와 유저네임도 토큰에 넣어줌
응답 헤더에 Authorization을 추가해 확인해보면

유저네임, 패스워드가 로그인 정상이라면
- 서버쪽에서는 세션 ID를 생성한다
- 클라이언트에게는 쿠키 세션 ID를 응답한다.
요청할때마다 쿠키값 세션아이디를 항상들고 서버쪽으로 요청하기 때문에
서버는 세션ID가 유효한지 판단해서 유효하면 인증이 필요한 페이지로 접근하게 하면된다.
[근데 우리가 방금 한 방법은?]
유저네임과 패스워드 로그인 정상일 때,
→ JWT토큰 생성
→ 클라이언트 쪽으로 JWT토큰을 응답
→ 요청할때마다 JWT토큰을 가지고 요청
→ 서버는 JWT토큰이 유효한지를 판단한다
→ 근데 지금 유효한지 판단하는게 없으니 만들어보자!
세션에서는 session.getatrubutte해서 하면되는데
토큰은 필터 만들어서 해야함
📍권한 확인 필터 생성
인증(Authentication), 권한부여(Authorization), 접근제어(Access Control) - Apache HTTP Server Version 2.2
Please note This document refers to the 2.2 version of Apache httpd, which is no longer maintained. The active release is documented here. If you have not already upgraded, please follow this link for more information. You may follow this link to go to the
httpd.apache.org
//시큐리티가 필터를 가지고 있는데 필터중에 BasicAuthentucationFilter라는 것이 있다.
//권한이나 인증이 필요한 특정 주소를 요청했을때 위 필터를 무조건 타게 되어있다.
// 만약 권한이나 인증이 필요한 애가 아니라면 이 필터를 안탐
public class JwtAuthorizationFilter extends BasicAuthenticationFilter {
    public JwtAuthorizationFilter(AuthenticationManager authenticationManager) {
        super(authenticationManager);
    }

    @Override
    protected void doFilterInternal(HttpServletRequest request, HttpServletResponse response, FilterChain chain) throws IOException, ServletException {
        super.doFilterInternal(request, response, chain);
        System.out.println("인증이나 권한이 필요한 주소 요청이 옴");

    }

}BasicAuthentucationFilter를 무조건 탄다는 것을 알아두자!

헤더에 어떤 값이 오는지 확인해보기 위해
System.out.println("jwt: " + jwtHeader);
다음과 같이 추가하고


헤더에 값을 넣고 돌려보면 다음과 같이 뜬다.
  @Override
    protected void doFilterInternal(HttpServletRequest request, HttpServletResponse response, FilterChain chain) throws IOException, ServletException {
        System.out.println("인증이나 권한이 필요한 주소 요청이 옴");
        String jwtHeader = request.getHeader("Authorization");
        System.out.println("jwt: " + jwtHeader);

        //헤더가 있는지 확인
        if (jwtHeader == null || !jwtHeader.startsWith("Bearer ")) {
            chain.doFilter(request, response);
            return;
        }
        //정상적인 사용자인지 확인
        String token = request.getHeader(JwtProperties.HEADER_STRING).replace(JwtProperties.TOKEN_PREFIX, "");
        String username =
                JWT.require(Algorithm.HMAC512(JwtProperties.SECRET)).build().verify(token).getClaim("userName").asString();
        //서명 되었는지 확인
        if (username != null) {
            User userEntity = userRepository.findByUserName(username);

            PrincipalDetails principalDetails = new PrincipalDetails(userEntity);
            // JWT 토큰 서명을 통해서 서명이 정상이면 Authentication 객체를 만들어준다.
            Authentication authentication =
                    new UsernamePasswordAuthenticationToken(principalDetails, null, principalDetails.getAuthorities());
            //강제로 시큐리티 세션에 접근하여 Authentication 객체저장해줌
            SecurityContextHolder.getContext().setAuthentication(authentication);

            chain.doFilter(request, response);
        }
    }
}- 헤더가 있는지 확인
- 정상적인 사용자인지 확인
- 서명되었는지 확인
- 서명이 정상이면 Authentication 객체를 만들어 강제로 세션에 저장해줌
'Spring' 카테고리의 다른 글
| [SpringBoot] OpenAI API 적용하기 (0) | 2024.08.07 |
|---|---|
| [Spring Security] 카카오 소셜 로그인 적용하기 (0) | 2024.07.08 |
| [Spring Security] 필터 테스트 (0) | 2024.07.03 |
| [Spring Security] 구글 로그인 분리 + 네이버 로그인 (0) | 2024.07.01 |
| [Spring Security] 구글 로그인 (0) | 2024.06.27 |