
🖥️ 회원가입
login
이전에는 어느 코드를 넣던 모두 로그인페이지로 이동했었는데
로그인페이지를 구현해보자
- 컨트롤러에 @RequestBody를 없애고 return을 “loginForm”이라고 한다.
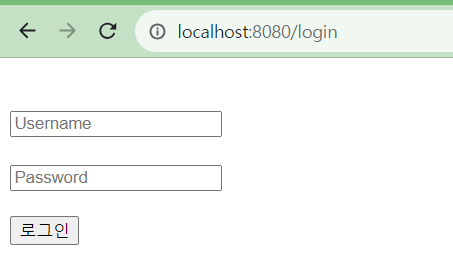
- loginForm.html 파일을 만든다.
그런데 로그인을 하기 위해서는 회원가입을 해야하는데 DB에 테이블이 없으니 만들어주자 !
그래서 model패키지를 만들고 그 밑에 User라는 클래스를 만들어
package com.cos.security1.model;

import jakarta.persistence.Entity;
import jakarta.persistence.GeneratedValue;
import jakarta.persistence.GenerationType;
import jakarta.persistence.Id;
import lombok.Data;
import org.hibernate.annotations.CreationTimestamp;

import java.sql.Timestamp;

@Entity
@Data
public class User {
    @Id
    @GeneratedValue(strategy = GenerationType.IDENTITY)
    private int id;
    private String username;
    private String password;
    private String email;
    private String role; //Role_User,Role_Admin
    @CreationTimestamp
    private Timestamp createDate;
}
그리고 회원가입 페이지를 세팅해준다.
<!DOCTYPE html>
<html>
<head>
    <meta charset="UTF-8">
    <title>
        회원가입 페이지
    </title>
</head>
<body>
<h1> 회원가입 페이지</h1>
<hr/>
<form action="/join"method="POST">
    <input type="text"name="username"placeholder="Username"/><br/>
    <input type="password"name="password"placeholder="Password"/><br/>
    <input type="email"name="email"placeholder="Email"/><br/>

    <button> 회원가입 </button>
</form>
</body>
</html>
<form action="/join"method="POST"> : 이걸 실행한 후 /join으로 이동하겠다!
비밀번호 암호화
join controller를 수정해준다 !
@GetMapping("/join")
    public String join(User user){
        System.out.println(user);
        //일단 강제로 넣어줌
        user.setRole("ROLE_USER");
        //id,create는 자동으로 만들어줌
        userRepository.save(user); // 회원가입은 잘됨  근데 이렇게 하면 안되는 이유가
        return "join";
    }
근데 이렇게 하면 회원가입은 잘되는데!
👉 시큐리티로 로그인을 할 수 없다 → 패스워드가 암호화가 되어있지 않기 때문!
⇒ 암호화를 해주자 !
public class SecurityConfig{
    @Bean
    BCryptPasswordEncoder encodePwd(){
        return new BCryptPasswordEncoder();
    }
	...
}
+) BCryptPasswordEncoder
스프링 시큐리티(Spring Seurity) 프레임워크에서 제공하는 클래스 중 하나로 비밀번호를 암호화하는 데 사용할 수 있는 메서드를 가진 클래스
: BCrypt 해싱 함수(BCrypt hashing function)를 사용해서 비밀번호를 인코딩해주는 메서드와 사용자의 의해 제출된 비밀번호와 저장소에 저장되어 있는 비밀번호의 일치 여부를 확인해주는 메서드를 제공한다.
@PostMapping("/join")
    public String join(User user){
        System.out.println(user);
        //일단 강제로 넣어줌
        user.setRole("ROLE_USER");
				//암호화
        String rawPassword = user.getPassword();
        String encPassword = bCryptPasswordEncoder.encode(rawPassword);
        user.setPassword(encPassword);
        userRepository.save(user);
        return "redirect:/loginForm";
    }
redirect:/loginForm : 위에 있는 loginForm 함수 호출해줌
회원가입을 하고
워크벤치 확인해보면 이렇게!

들어가있는 것을 확인할 수 있다 !
자 정리하자면
👉 <form action="/join" method="post"> 회원가입 /joinform에서 버튼을 누르면 /join이 작동하고 /join을 controller에서 확인해보면 @PostMapping("/join") 이렇게 시작하는 부분부터 돌아갑니다
-> return 을 redirect:/loginForm 라고 했기 때문에 다시 로그인페이지로 이동함!
🖥️로그인
package com.cos.security1.config;

import org.springframework.context.annotation.Bean;
import org.springframework.context.annotation.Configuration;
import org.springframework.security.config.annotation.web.builders.HttpSecurity;
import org.springframework.security.config.annotation.web.configuration.EnableWebSecurity;
import org.springframework.security.crypto.bcrypt.BCryptPasswordEncoder;
import org.springframework.security.web.SecurityFilterChain;

@Configuration
@EnableWebSecurity
public class SecurityConfig{
    @Bean
    BCryptPasswordEncoder encodePwd(){
        return new BCryptPasswordEncoder();
    }
    @Bean
    public SecurityFilterChain filterChain(HttpSecurity http) throws Exception {
        http.csrf(csrfConfigurer -> csrfConfigurer.disable());
        http.authorizeRequests()
                .requestMatchers("/user/**").authenticated()
                .requestMatchers("/manager/**").access("hasAnyRole('ROLE_MANAGER','ROLE_USER')")
                .requestMatchers("/admin/**").access("hasRole('ROLE_USER')")
                .anyRequest().permitAll()

                //어디로 이동하던지 login 페이지가 뜨도록설정
                .and()
                .formLogin((formLogin)->formLogin.loginPage("/loginForm").loginProcessingUrl("/login"));

        return http.build();
    }
}
.formLogin((formLogin)>formLogin.loginPage("/loginForm").loginProcessingUrl("/login")); 여길 보면 loginProcessingUrl 라는게 있죠?
loginProcessingUrl : login 주소가 호출이 되면 시큐리티가 낚아채서 대신 로그인을 진행해준다 !
⇒ 그래서 컨트롤러에 /login을 안만들어 줘도 됨!
PrincipalDetails (implements UserDetails)
config밑에 auth라는 패키지를 만들고 PrincipalDetails.java파일을 생성한다.
package com.cos.security1.config.auth;

import com.cos.security1.model.User;
import org.springframework.security.core.GrantedAuthority;
import org.springframework.security.core.userdetails.UserDetails;

import java.util.ArrayList;
import java.util.Collection;

public class PrincipalDetails implements UserDetails {

    private User user; //콤포지션

    public PrincipalDetails (User user){
        this.user=user;
    }

    @Override
    public Collection<? extends GrantedAuthority> getAuthorities() {
        Collection<GrantedAuthority> collect = new ArrayList<>();
        collect.add(new GrantedAuthority() {
            @Override
            public String getAuthority() {
                return user.getRole();
            }
        });
        return collect;
    }

    @Override
    public String getPassword() {
        return user.getPassword();
    }

    @Override
    public String getUsername() {
        return user.getUsername();
    }

    @Override
    public boolean isAccountNonExpired() {
        return true;
    }

    @Override
    public boolean isAccountNonLocked() {
        return true;
    }

    @Override
    public boolean isCredentialsNonExpired() {
        return true;
    }

    @Override
    public boolean isEnabled() {
        // 언제 false하냐
        // 1년동안 로그인을 안할시
        //현재시간 - 로그인시간 = 1년 초과시 return false
        return false;
    }
}
❗시큐리티가 /login주소요청이 오면 낚아채서 로그인을 진행시킨다
→ 로그인 진행이 완료되면 Security session을 만들어주는데, 이때 세션공간은 시큐리티만을 위한 것이다.
→ 이 말이 뭐냐 ⇒ 키 값을 구분한다! (Security ContextHolder라는 키 값에 세션 정보를 저장한다.)
→ 이 세션에 들어갈 수 있는 오브젝트는 authentication 타입의 객체이고, authentication안에는 유저 정보가 있어야 한다.
→ 유저 오브젝트의 타입은 UserDetails타입 객체이다.
👉 Security Session -> authentication -> User Details(PrincipalDetails)
저 코드에서
@Override
    public Collection<? extends GrantedAuthority> getAuthorities() {
        Collection<GrantedAuthority> collect = new ArrayList<>();
        collect.add(new GrantedAuthority() {
            @Override
            public String getAuthority() {
                return user.getRole();
            }
        });
        return collect;
    }
우리가 입력받은 자료형은 String 형이다!( “ROLE_USER”,”ROLE_MANAGER”)
→ 근데 Colletion<GrantedAuthority>형으로 리턴을 해야하네,,,,
⇒ new ArrayList<>(); 해서 add를 사용하고, 안에 또 GrantedAuthority이 들어가야하므로 객체를 새로 만들어서 리턴타입이 String 형인 함수를 오버라이딩 해준다!
이제 뭐해야할까
👉 Security Session -> authentication -> User Details(PrincipalDetails)
이 순서에서
User Details(PrincipalDetails)
을 처리했으므로 authentication 객체를 만들어서 그 안에다가 넣어줘야 한다.
PrincipalDetailsService
package com.cos.security1.config.auth;

import com.cos.security1.model.User;
import com.cos.security1.repository.UserRepository;
import org.springframework.beans.factory.annotation.Autowired;
import org.springframework.security.core.userdetails.UserDetails;
import org.springframework.security.core.userdetails.UserDetailsService;
import org.springframework.security.core.userdetails.UsernameNotFoundException;
import org.springframework.stereotype.Service;

@Service
public class PrincipalDetailsService implements UserDetailsService {
    @Autowired
    private UserRepository userRepository;

    @Override
    public UserDetails loadUserByUsername(String username) throws UsernameNotFoundException {
        User userEntity = userRepository.findByUsername(username);
        if(userEntity!=null){
            return new PrincipalDetails(userEntity);
        }
        return null;
    }
}
시큐리티 설정에서 loginProcessingUrl/("/login"); 로그인요청이 오면 UserDetailsService 타입으로 IoC되어있는 loadUserByUsername함수가 실행된다. (이건 그냥 규칙임)
근데 아까 loginForm.html 에서 입력 값으로 name=username, name=password를 입력 받았는데,
위의 loadUserByUsername(String username) 매개변수 username이 name=username 이름과 동일해야한다.
username2되어있으면 안된다는 소리.
+)
package com.cos.security1.repository;

import com.cos.security1.model.User;
import org.springframework.data.jpa.repository.JpaRepository;
import org.springframework.stereotype.Repository;

//@Repository 라는 어노테이션이 없어도 IoC가 된다. -> JpaRepository를 상속했기 떄문이다.
public interface UserRepository extends JpaRepository<User,Integer> {
    //select * from user where username =?
    User findByUsername(String username);

}
👉 회원가입 → 로그인페이지 → 로그인페이지 버튼 누르면 로그인요청이 감
→ UserDetailsService 타입으로 IoC되어있는 loadUserByUsername함수가 실행됨
→ 레포지토리에서 유저 이름을 찾아서 넣어주고
→ securityConfig에서 설정해준 .defaultSuccessUrl("/")); 때문에 / 페이지로 이동
권한처리 - 1 (하나만 걸때)

매니저, 어드민으로 로그인해보자
> /user 와 /manager다 접근 가능
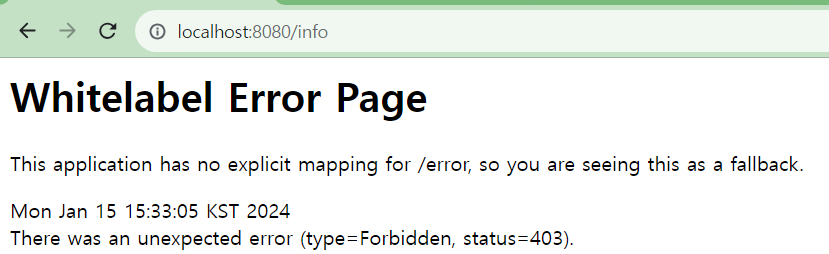
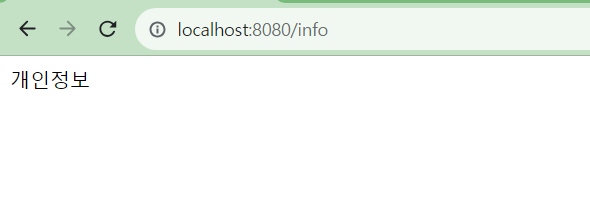
info라는 개인정보 창을 만들고 "ROLE_ADMIN” 권한을 가진 사람만 접근할 수 있게 하려고 한다.
@GetMapping("/info")
    @Secured("ROLE_ADMIN")
    public @ResponseBody String info(){
        return "개인정보";
    }
@EnableMethodSecurity(securedEnabled = true)//secured어노테이션 활성화 목적
어노테이션 추가 해줌 !
권한처리-2 (둘이상 걸때)
@EnableMethodSecurity(securedEnabled = true, prePostEnabled = true)//secured어노테이션 활성화 목적,preAuthorize 활성화
preAuthorize 활성화하는 코드 추가해줬습니다 !
@PreAuthorize("hasRole('ROLE_MANAGER') or hasRole('ROLE_ADMIN')")
    @GetMapping("/data")
    public @ResponseBody String data(){
        return "데이터";
    }
→매니저와 어드민에서만 작동하는거 확인 !
+) 인가(Autorization)를 검사하기 위해 @PreAuthorize, @PostAuthorize, @Secured를 사용할 수 있다.
[Spring Security] @PreAuthorize, @PostAuthorize, @Secured
PreAutorize: 메소드가 실행되기 전에 인가를 검사한다. PreAutorize("hasRole("ROLE_ADMIN")")publuc void updateUser(int userId){ ... }만약 코드가 다음과 같다면 메서드가 실행되기 전에 스프링 EL 표현식을 평가하고
88dldl.tistory.com
[참고자료]
[Spring][Spring Security]BCryptPasswordEncoder란?
목표 BCryptPasswordEncoder가 무엇인지 이해합니다. BCryptPasswordEncoder의 메서드 구성을 공부합니다. BCryptPasswordEncoder의 메서드를 직접 사용해봅니다. 순서 1. BCryptPasswordEncoder란? 2. BCryptPasswordEncoder 메서
kimvampa.tistory.com
'Spring' 카테고리의 다른 글
| [Spring Security] 구글 로그인 분리 + 네이버 로그인 (0) | 2024.07.01 |
|---|---|
| [Spring Security] 구글 로그인 (0) | 2024.06.27 |
| [Spring Security] @PreAuthorize, @PostAuthorize, @Secured (0) | 2024.06.25 |
| [Spring Security] WebSecurityConfigurerAdapter deprecated 이슈 (0) | 2024.06.25 |
| [Spring Security] 1. 기본설정, SecurityConfig (0) | 2024.06.25 |